 |
http://unicon.org/utr/utr6c.html Department of Computer Science University of Idaho Moscow, ID 83844 |
Susie Jeffery and Clinton Jeffery
Unicon Technical Report #6c
February 28, 2019
Abstract
|
http://unicon.org/utr/utr6c.html Department of Computer Science University of Idaho Moscow, ID 83844 |
| Introduction | 3 | |
| Part I A Simple IVIB Application | ||
| Hello IVIB | 3 | |
| Ivib and Event-driven Programming | 5 | |
| Menu Bar | 7 | |
| Buttons and Labels | 10 | |
| The About Box | 11 | |
| The Help Screen | 12 | |
| Adding the Code | 13 | |
| Makefile | 14 | |
| Running the Program | 15 | |
| Part II Another Simple IVIB Application | ||
| Modeless Dialogs | 18 | |
| Tables and Tab Sets | 25 | |
| Capturing Events, Click Counts and GoTo | 28 | |
| Overlays and Hour Glasses | 30 | |
| Copy, Cut, Paste, Undo, Redo | 32 | |
| Tab Jumps and Compound Undo/Redo | 37 | |
| Table Column Events | 40 | |
| Conclusions and Future work | 42 |
This report describes how to use Unicon's new GUI toolkit and its interface builder program, IVIB. This package was written by Robert Parlett, with minor improvements by the authors and other contributors. Compared with the Icon-based tools, Mr. Parlett's toolkit is elegant, feature-rich, extensible, and deep. Unless you are familiar with similar class libraries, IVIB and its GUI toolkit may seem daunting in its complexity. This report demystifies some typical uses of IVIB Version 2. We hope you come to enjoy it as much as we have. A great deal of additional documentation on these tools can be found in the book "Programming with Unicon" [Jeff01].
p() is as follows.
Go ahead and type this procedure in using the ui program or your favorite text
editor, and save it to a file named p.icn.
procedure p()
   write("hello, world")
end
To start building our GUI, execute the Ivib program. Below its title bar it
has a menu bar with File, Canvas, Selection, and Objects menus, and below
that it has a tool bar that allows you to easily create many kinds of widget
in the GUI library. Below the toolbar is the main Ivib drawing area, called
the canvas.
The Button widget is the top leftmost widget in the toolbar. Go ahead and click on it; a button labeled "Button" appears in the upper left area of the canvas. You can drag it approximately to the center of your canvas area. To modify aspects of the widget's functionality or appearance, right click on it and select Dialog from the popup menu. The widget's setup dialog allows you to change all aspects of the widget. The top half of the dialog controls properties relevant to all widgets, such as position on screen, graphical attributes, and what variable name will hold the widget. The bottom half of the dialog controls properties specific to the particular type of widget being modified (in this case, a TextButton). TextButtons have a Label attribute that contains the text on the face of the button. Click in that text area and change "Button" to "Go!". Then click on the Okay button at the bottom of the dialog. Your resulting screen might look something like this:

Figure 1: go.icn
At this point, you have created a graphical interface with a button on
it. When you save this as
go.icn, Ivib will generate the Unicon source code
for the graphical interface, with the Ivib representation of that graphical
interface encoded as a strange looking comment at the end of the file. If
you compile it, you can produce a working program, but it won't do anything
when the Go! button is pressed.
Suppose our procedure p() given above is located in a file
p.icn, which will hopefully be true by now. What we want to
do is make the interface call p()
whenever the button is pressed. An object (whose class is a subclass of
Dialog in package gui) owns the control flow and processes user input. Each
user activity (key press, mouse click) in the dialog is turned into an Event
object and sent to the interface object being manipulated (the button,
scrollbar, or other widget that was "clicked"). In Ivib, the object's dialog
has an Events... tab that allows the programmer to associate a different
handler method with code to handle each kind of event. To sum up: an
interface has a corresponding Dialog class. For each widget foo you can
optionally ask for a class variable foo that holds the actual widget object
reference, and can write methods that are called when an event occurs on
that widget.
In order for our button to call our procedure p(), we need to
find out (or assign) the button's variable name. To do this, select the
button, right click on it, and open its Dialog. The Name tab contains a
Name
field that determines the variable name for this widget. Change the name
from text_button_1 to go. Your dialog should look
something like this:

Click Okay to exit the dialog. Save the ivib session (File...SaveAs) in file go.icn.
At this point, you can compile go.icn as a standalone program that does
nothing (unicon go). But it might be more interesting to tell the dialog
what code to execute (namely, a call to the procedure p()
mentioned earlier)
when the "go" button is clicked. Go over to the Events tab, click on Add,
and associate a method on_go() with ACTION_EVENT
by clicking the Apply button.

Click OK, and then save your file. At this point if you go into file
go.icn and look at the code, the dialog has an empty method
method on_go(ev)
end
into which we can insert a call to
p() using the ui IDE, or
emacs or another text editor:
method on_go(ev)
   p()
end
Save go.icn with this call to p() added, and then
compile go.icn and p.icn together
(unicon go p), and run it (./go). If
successful, this application will run as described and write
"Hello, world" to standard output when you click the button.
Warning! Editing your file with Ivib and a text editor at the same time makes it easy for you to overwrite work done in one tool when you save in another tool. The safest thing is to Quit Ivib when you are editing code, and quit your editor when you do an Ivib session. In the future we will make Ivib smarter about trying not to lose your work, and probably integrate it into an IDE so the text editor and Ivib sessions always know when to switch back and forth.
This dazzling example is given in glorious click-by-click detail in order to familiarize you with IVIB and to teach you many of its capabilities by osmosis. All you should have to do is follow the instructions. Hopefully you will feel recklessly capable of writing similar applications on your own afterwards.
Right click on the Menu Bar and select the dialog option. The MenuBar setup in the bottom box of the dialog will look like this:
|
|
-----------Edit me
|       |
|       |
|
Add the File menu. Select
Edit me, hit the edit button,
and change the Label field to File. Click Okay.
The tree will now look something like this:
|
|
-----------File
|       |<-------------------------------------click here and Add label
|
Add the Exit command. Highlight the branch by clicking in the position shown above. The Add label button will become available; click on it. A new branch labeled Edit me will be added to the branch. Edit this branch by clicking on the Edit button, change the Label field to say Exit, and switch to the Code tab. Change the object name to exit and then click the Event handler checkbox to create an
on_exit handler
method. Before you click OK the screen should look like:

Press Okay.
The tree will now look something like this:
|
|
-----------File
|       |
|       |-------------Exit(Txt)
|       |
| <-----------------------------------------click here to add a menu item
Add the Help menu from the trunk of the tree. Highlight the branch by clicking in the position shown above. The Add Menu button will become available; click on it. A new branch labeled Edit me will be added to the tree. Edit this branch by clicking on the Edit button, change the Label field to say Help, and click Okay. The tree will now look something like this:
|
|
-----------File
|       |
|       |-------------Exit(Txt)|
|       |
|
|---------Help
|       |<-----------------------------------------click here to add a menu label
|
Add the About command. Highlight the branch by clicking in the position shown above. The Add label button will become available; click on it. A new branch labeled
Edit me will be added to the
branch. Edit this branch by clicking on the Edit button, change the Label to
About... and select the Code tab. Change the object name to
about and then click the event handler to create an on_about
handler method. Click Okay. The tree should now look something like this:
|
|
-----------File
|       |
|       |-------------Exit(Txt)
|       |
|
|---------Help
|      |
|      |------------About
|      |<-----------------------------------------click here, Add a label
|
Add the Help command. Highlight the branch by clicking in the position shown above. The Add label button will become available; click on it. A new branch labeled Edit me will be added to the branch. Edit this branch by clicking on the Edit button, change the label to Help, and switch to the Code tab. Change the object name to help, and then click the Event handler checkbox to create an
on_help event handler method.
Click Okay. The tree will now look something like this:
|
-----------File
|       |
|       |-------------Exit(Txt)
|       |
|
|---------Help
|      |
|      |------------About(Txt)
|      |
|      |------------Help(txt)
|
Hit Okay.
Add a Message Box Label to the canvas by clicking on the Label component (designated "Abc") on the Ivib menu bar. Move the label to the bottom of the canvas. Resize the width to almost the size of the canvas and resize the height to about the same height as the button.
Right click on the Message Box and select the dialog option. Change the label to be empty, then click on the Name tab. Change the name to MsgBox, then click on the Other tab. Click on the Class variable radio button and the Draw Border checkbox so that there will be a border around our message box.
Select the Attribs Tab. Click Add and replace the Edit and me to fg and red respectively. This will change the foreground color to red.
 Attrib        Value
 fg            red
Click the Apply button to save the attribute. Press the Add button and replace the Edit and me with the values below. This will change the font attributes.
 Attrib        Value
 font          serif,18,bold
Hit the Apply button to save the changes. Hit Okay.
Enter the canvas attributes. Select the Canvas menu option Dialog prefs...
On the Attribs tab change the background from pale gray to yellowish white by selecting Add and changing the fields as follows:
 Attrib        Value
 bg            yellowish white
Hit the Apply button to save the changes
On the Methods tab, leave the Generate main() procedure
button on so the box is checked. We want to put our main procedure in this
file.
On the Code tab, change the Name field to maindialog.
Name maindialogHit Okay.
From Ivib, go to the File menu and save the file.
File->Save as: main.icnMake sure you save them in the directory you made for this application
Add a Text List Box by clicking on the Text List component on the Ivib Menu Bar (this is the one in the upper right corner). Move it to the center, then right click on it to get the dialog selection. Under the Name tab, change its name to AboutTxtLst, then select the Other tab and click on the Class variable radio button. Hit Okay.
Add the canvas attributes. Select the Dialog prefs... item from the Canvas menu.
On the Attribs tab, click Add. A pair of text input boxes will appear for the attribute you want added; the attribute name field says "Edit" and the attribute value says "me". Replace the "Edit" with attribute name "label" and replace the attribute value "me" with a the value "About Ivib Primer". Click Apply.
On the Methods tab, un-click the
Generate main() procedure
button so the button is not down. We do not want a main procedure in this
file.
On the Code tab, change the name to aboutdialog. Finally, on the Events tab, click Add and change the event to MOUSE_PRESS_EVENT and change the method name to on_aboutdialog (this method will quit the dialog). Click Apply. The screen should look like:
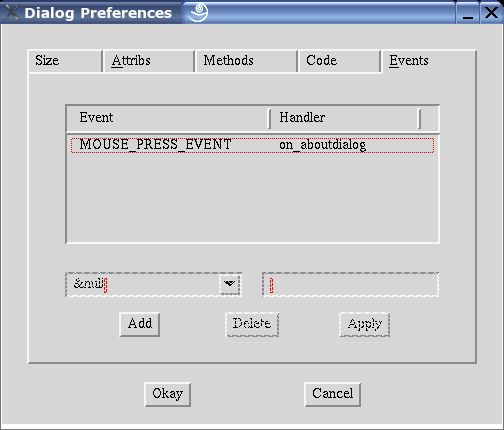
Click Okay.
From Ivib, go to the File menu and save the file with the name about.icn.
File->Save as: about.icnMake sure you save it in the directory you made for this application.
Add a Text List Box to this canvas by clicking the Text List component from the Ivib Menu Bar. Move it to the center and then right click on it to get the dialog attributes. Select the Name tab, and change the name to HelpTxtLst. Select the Other tab, and click on the Class variable radio button. Click Okay.
Add a Button to the canvas, by clicking on the Button Component from the Ivib Menu Bar. Move the Button to somewhere near the bottom of the canvas below the text box.
Right click on the Button and select the dialog option. Change the Label to Close, and select the Name tab. Change the name to CloseBtn. On the Events tab, click Add to create an on_CloseBtn() handler method. Click Apply, and then Okay.
Add a Message Box to the canvas by clicking on the Label component (Abc) on the Ivib menu bar. Move the label to the bottom of the canvas and resize it to be almost the length of the canvas.
Right click on the Label and select the dialog option. Change the Label field to be empty.
On the Name tab, change the name to MsgBox. On the Other tab, select the Class variable radio button. Click the Draw Border check box so that there will be a border. Click Okay.
Add the canvas attributes.
Select the Ivib Canvas menu's Dialog prefs... item. On the Attribs tab,
Press Add to add an attribute. Change the attribute name from Edit
to label and change the value me to
Ivib Primer Help. On the Methods tab,
un-click the Generate main() procedure
button so the box is not checked. We do not want a main() procedure in this
file.
On the Code tab, change the name to helpdialog. Click Okay.
From Ivib, go to the File menu and save the file.
File->Save as: help.icnMake sure you save the file in the directory you made for this application.
You can exit out of Ivib now with the File menu's Quit item.
If you look at the file main.icn you will notice Ivib created a class called maindialog and various methods that are associated with the components we added. For example, method on_about() will be the method used when you click on the about menu item on the menu bar. Method init_dialog() is the first method called when the class is created. It is a good place to initialize variables. It is our job to write the code for these methods.
If any of the components are not spelled correctly, correct them using Ivib to keep the program code consistent with the graphics. However, when you change the names using Ivib, Ivib will add your new names, but not delete the old names. You may want to search the file for any references to the old names and remove all methods and references to the old names. If you do not remove the old names, your code will still work, but you will have unused methods and objects cluttering up the file. Also, remember Unicon is case sensitive. All references to the objects must be the same case.
Main Dialog Class. Edit the file main.icn using your favorite editor. This file contains the main procedure, which starts the application by displaying the main screen. Some of the methods in the file main.icn are shown below:
import gui
$include "guih.icn"
#
# maindialog is the class created by Ivib in the file main.icn
#
class maindialog : Dialog(MsgBox,........)
   ...
method on_ListBtn(ev)
end

method on_about(ev)
end

method on_exit(ev)
end

method on_help(ev)
end
   ...
end # dialog class
Find the main() procedure and change it if needed so it looks as shown below. This will cause the main screen to be displayed when the program starts up.
procedure main()
   local d
   d := maindialog()
   d.show_modal()
end
Add code so the About Canvas is displayed when the About Menu item is selected. Add the following code to on_about():
method on_about(ev)
   aboutdialog().show_modal()
end
Add code so the Help Canvas is displayed when the Help Menu item is selected. Add the following code to on_help():
method on_help(ev)
   helpdialog().show_modal()
end
We also need to add code to terminate the application when the Exit menu item is selected. Add the dispose() function to on_exit().
method on_exit(ev)
   dispose()
end
Save this file as main.icn. Make sure you save it in the directory you made for this application.
make program. On Windows, if you obtain
a version of the make program such as make.exe or
nmake.exe, you can follow these instructions; in the makefile
the executable (main) may need to be modified to say main.exe.
Create another file named makefile and enter the following. Be careful to follow make's syntax by beginning the unicon command lines with tab characters; some text editors (such as "edit") convert these to spaces on you, which may cause the make (or nmake) program to fail. For example, if you just copy and paste these lines from your web browser, you will not have tab characters pasted where they need to be; sorry! Notepad, or better yet a real programmer's editor, will preserve your tab characters.
#
# makefile
#
CFLAGS=-c
main: main.u about.u help.u
        unicon -G -o main main.u about.u help.u
about.u: about.icn
        unicon $(CFLAGS) about
help.u: help.icn
        unicon $(CFLAGS) help
main.u: main.icn
        unicon $(CFLAGS) main
Make sure you save it in the directory you made for this application At the shell/command-line prompt enter:
...% makeIf everything went well, there will not be any errors at this point.
Note: if no make or nmake is available you can enter at the shell/command prompt:
...% unicon -G main.icn about.icn help.icn
...% main(On Linux if the current directory is not on your PATH you can say ./main)
When successful, the main screen will be displayed. You should be able to hit the menu items and view the help and about dialogs.
The About Box. Edit the file about.icn using your favorite editor. Some of the methods in the file about.icn are shown below
#
# aboutdialog is the class created by Ivib in the file about.icn
#

class aboutdialog : Dialog(AboutTxtLst)
   ...
   method init_dialog()
   end
   method on_aboutdialog(ev)
   end
   ...
end    # aboutdialog
We need to fill the Text List with the About information. We could actually have done this from inside Ivib, but just for fun let's add code to
init_dialog() so the Text List is filled when the canvas is
displayed. Edit about.icn and add the following code to the
init_dialog() and on_aboutdialog() methods.
method init_dialog()
   local l
   l := [
         "This is an example application",
         "To demonstrate an About Box",
         "Also, how to show another form",
         "Plus: using Makefiles with",
         "Ivib"
         ]
     AboutTxtLst.set_contents(l)
 end

 method on_aboutdialog(ev)
     dispose()
 end
The Help Screen. Edit the file help.icn using your favorite
editor. Some of the methods in the file help.icn are shown below.
#
# helpdialog is the class created by Ivib in the file help.icn
#

class helpdialog : Dialog(HelpTxtLst, MsgBox)
   ...
   method init_dialog()
   end
   method on_CloseBtn(ev)
   end
   ...
end  # helpdialog class
The help screen will read in a text file and display it in the text list we created. We'll add code to the method init_dialog() to open the help file and display it. Edit the file help.icn and add the following code to the method init_dialog():
   method init_dialog()
   local l, helpfile, fd
      helpfile := "help.txt"
      if fd := open(helpfile) then {
         MsgBox.set_label("File " || helpfile || " ")
         l := []  # create an empty list
         while put(l, read(fd)) # read lines, put in list
         close(fd)
         HelpTxtLst.set_contents(l)
         }
      else
         MsgBox.set_label("Cannot open help file: " || helpfile)
   end
We also need to add code to terminate the application when the Cancel Button
is clicked. Add a call to the dispose() function to on_CloseBtn().
method on_CloseBtn(ev)
   dispose()
end
You will also need to create a text file named help.txt with any information you find helpful.
The Main Screen. The main dialog will demonstrate the use of file dialog box. It will open a file dialog when the List Button is pressed and display the selected file in a message box. First we need to link in the FileDialog class from the Unicon class library. Add the link statement before the maindialog class declaration as follows:
import gui
$include "guih.icn"

link filedialog         # this the line you add
Add the following code to the on_ListBtn() method.
The file dialog
will be displayed when the List button is pressed and the selected
file will be displayed in the MsgBox.
method on_ListBtn(ev)
   local s, fd
      fd := FileDialog()
      fd.set_attribs("label=Select file demonstration")
      fd.show_modal(self)
      s := fd.get_result() | fail
      if /s | s == "" | s[-1] == "\\" then {
         MsgBox.set_label("Select a file")
         return
         }
      MsgBox.set_label("File : " || s || " was selected ")
end
The application is now complete. Use the makefile or Unicon command to
compile and link the program and run the application as described in the
Makefile section above. Now you can go back and add labels, or resize
components as needed.
Enter the canvas attributes. Either right click on the Canvas for Dialog or go to the file menu option Canvas->Dialog prefs.
On the Code tab, enter:
Name dialogmainOn the Methods tab, leave the
Generate main() procedure
checkbox ON so the box is checked. We want to put our main()
procedure in this file. Leave all
the other checkboxes on on the Methods Tab checked also.
On the Attribs tab, Hit Add and replace Edit me with:
| Attrib | Value | |
|---|---|---|
font | sans,12
|
Hit Apply. This will set the default font to sans 12 for every component in this dialog.
On the Events tab, hit the Add Button.
Under Event:
Hit scroll down to CLOSE_BUTTON_EVENT.
Under Handler enter:
on_dialogmain.
We will use this method to capture the Windows X (close) event at the top
right of the Dialog.
Hit Apply.
Hit Okay to close Dialog Prefs.
Add a Button to the canvas, by clicking on the Button Component from the Ivib Menu Bar. Move the Button to somewhere around the left side of the canvas. Note: you can resize the canvas or the button by dragging the right bottom corner to make it larger/smaller.
Right Click on the Button to add some attributes as follows:
On the General tab enter:
Label Modeless
On the Other tab:
Check the Class variable checkbox
On the Name tab:
Name text_button_modeless
On the Events tab:
Hit the Add Button
Under Event:
Scroll down to BUTTON_RELEASE_EVENT
Under Handler enter: (it may be automatically added)
on_text_button_modeless
Hit Apply.
This will create a method on_text_button_modeless()
that will be invoked by a BUTTON_RELEASE_EVENT.
Hit Okay.
You may need to resize the button so the text will fit.
Add an Exit Button by clicking on the Button icon on the Tool Bar. Right Click on the Button to add some attributes as follows:
On the General tab, enter: Label Exit
On the Name tab, enter: Name text_button_exit
On the Other tab, check the: Class variable checkbox
On the Events Tab: Hit the Add Button
Under Event: Scroll down to BUTTON_RELEASE_EVENT
Under Handler enter: (it may be automatically added)
on_text_button_exit
Hit Apply
Hit Okay
Move the exit button to the bottom right side of the dialog as shown in Figure 6 of main.icn below:
Figure 6: main.icn my button Tab
Add a Message Box Label to the canvas by clicking on the Label component (Abc) on the Ivib menu bar. Move the label to the bottom of the canvas and resize it to be almost the width of the canvas. Refer to the Figure 6. The message label is the long rectangle at the bottom of main.icn. Right Click on the Label to add some attributes as follows:
On the Other tab, check the:
Class variable checkbox
Click the Draw Border check box so that there IS a border.
On the Name tab enter:
Name label_msgbox
On General Tab enter:
Label : (make it blank - this label will be our message box)
Hit Okay
From the Menu, Slect File->Save As and enter main.icn
File->Save as: main.icnMake sure you save them in the directory you made for this application.
Create an Edit Dialog by going to the Ivib menu to File->New. A blank canvas will appear.
Enter the canvas attributes. Either right click on the Canvas for Dialog or go to the file menu option: Canvas->Dialog prefs.
On the Code tab enter:
Name dialogedit
On the Methods tab, un-check the
Generate main() procedure checkbox, so the
checkbox is NOT checked. We DO NOT want to put a main
procedure in this file.
On the Attribs tab, hit Add and replace Edit me with:
Attrib		Value
label		Edit dialog		Hit Apply
font		sans,12		Hit Apply
This will add a title to the top of the canvas and change the default font to sans. You can also add different background and foreground colors by using the attributes bg and fg.
On the Events Tab :
Hit Add and scroll down to CLOSE_BUTTON_EVENT. Enter
on_dialogedit for the Event Handler and hit Apply. We will use this method
to capture the Windows X (close) Event at the top right of the Dialog. Note
Ivib may have added another event handler. Please delete it. The
CLOSE_BUTTON_EVENT handled by the on_dialogedit method should be the only
entry. Hit Okay to close Dialog Prefs.
Add an Exit Button by clicking on the Button icon on the Tool Bar. Right Click on the Button to add some attributes as follows:
On the General tab enter:
Label Exit
On the Name tab enter:
Name text_button_exit
On the Other tab check the:
Class variable checkboxOn the Events Tab, hit the Add Button.
BUTTON_RELEASE_EVENT
Under Handler enter:
on_text_button_exit (it may be automatically added)
Hit Apply.
Hit Okay
You may need to resize the button so the text will fit. Move the Exit button to bottom right corner as shown in Figure 7 of edit.icn below:
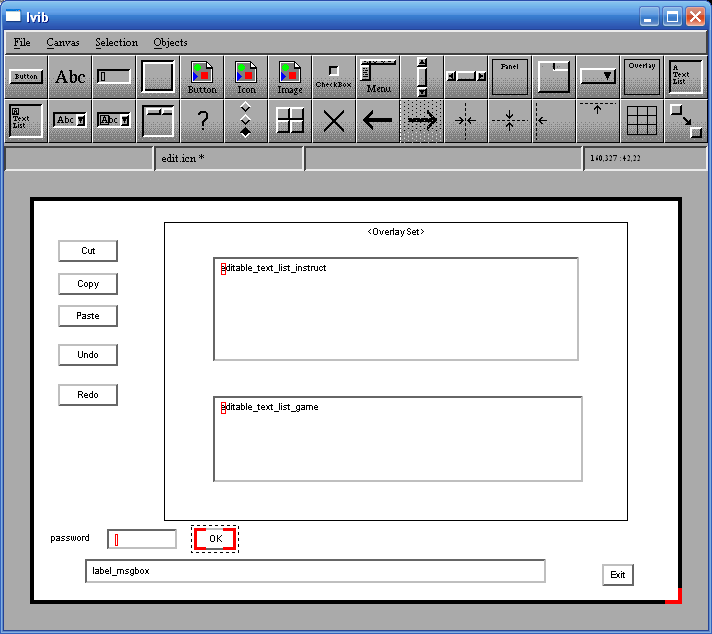
Figure 7: edit.icn
Add a Message Box Label to the canvas by clicking on the Label component (Abc) on the Ivib menu bar. Move the label to the bottom of the canvas and resize it to be almost the width of the canvas. Refer to Figure 7 of edit.icn. The message label is the long rectangle at the bottom of figure 7. Right click on the Label to add some attributes as follows:
On the Other tab check the:
Class variable checkbox
Click the Draw Border check box so that there is a border.
On the Name tab enter:
Name label_msgbox
On General tab enter:
Label : (make it blank - this label will be our message box)
Hit Okay
From Ivib, go to the File menu and execute this command:
File->Save as: edit.icnMake sure you save them in the directory you made for this application and close Ivib.
3) Using an editor, open up main.icn
Caution! Because you are saving files using Ivib and your editor,
make sure that you save your file using the text editor before changing the
graphics using Ivib. Also, make sure that you refresh the buffer (get the
the latest) in your text editor after you change the graphics using Ivib. If
you are nervous about writing over your changes you can make a backup copy
to see how this works. Using the Gnu Emacs editor is a good idea, since it
reminds you to refresh the buffer if Ivib has changed anything. Also, if you
renamed any variables, the old names and their methods may still be
there. Note: all variables are case sensitive so CancelBtn is not the same
as cancelbtn. For example, if you forgot to uncheck generate main
procedure, the main procedure will still remain. You will need to
manually remove the main procedure and uncheck it in Ivib.
Edit main.icn and add the following code to the on_text_button_modeless method:
 method on_text_button_modeless(ev)
   dedit := dialogedit()
   dedit.show_modeless()             # show edit dialog
   dispatcher.message_loop(dialogmain())
 end
The third line
dispatcher.message_loop(dialogmain()) makes the
modal dialogmain the parent of the modeless dialogedit. When using modeless
dialogs, at least one dialog must be modal. In this case, it is the main
dialog. You only need to add this line once. If you call a modeless dialog
from dedit, the dialogedit, you will not need this line.
Also, add dispose() to the on_text_button_exit()
method to close the dialog.
method on_text_button_exit(ev)
  dispose()
end
Add the following code to on_dialogmain so the dialog will close for the X event
method on_dialogmain(ev)
  if \ev.param = -11 then  #windows x box
     on_text_button_exit(ev)
end
Save main.icn.
Edit edit.icn and add the following code to
on_text_button_exit() to close the dialog.
method on_text_button_exit(ev)
   dispose()
end
Also add the following code to on_dialogedit.
method on_dialogedit(ev)
  if \ev.param = -11 then  #windows x box
     on_text_button_exit(ev)
end
Save edit.icn.
Compile the program:
> unicon -o demo -G main.icn edit.icnRun the program
> demoWhen the main dialog comes up, you can click on the 'Modeless' button and a new edit dialog will appear. Notice you can go back and forth from main dialog to edit dialogs. Every time you click, a new dialog will be created. This is different from the show_modal dialogs where the focus was only given to one dialog at a time.
We may not want our users creating too many dialog boxes. Let’s add Some code to limit them to one only. If they click on the modeless button, and there is already a dialog open, we will set the focus on the already opened dialog box.
In main.icn, add the global variable dedit at the top of main.icn (before the class declaration). This is the edit dialog variable that will tell us if the dialog is open.
global deditAdd the following code to the
on_text_button_modeless() method
and the int_dialog() method.
method on_text_button_modeless(ev)
   local winedit

   if \dedit then {
      if winedit := dedit.get_win() then {
         Raise(winedit)
         dedit.set_focus(dedit.label_msgbox)
         return
      }
   }

   dedit := dialogedit()
   dedit.show_modeless()             # show edit dialog
   dispatcher.message_loop(dialogmain())
end
method init_dialog()
   dedit := &null
end
Save main.icn in the correct directory.
In edit.icn, add the dedit := &null line to the on_text_button_exit method:
method on_text_button_exit(ev)
    dedit := &null
    dispose()
 end
This sets the global variable dedit to &null
when the Dialog is closed. It
can be closed by hitting the exit button or by hitting the X button in the
right top corner.
Save the file. Compile and run the program. You will get only one edit dialog no matter how many times you hit the modeless button.
table data type.
Add a Tabset to the main.icn canvas by clicking on the Tabset Component from the Ivib Tool bar. It is the fourth component from the right on the top row. Move the Tabset to somewhere around the middle of the canvas. Enlarge it so it is similar to Figure 6. Right Click on the TabSet to add some attributes as follows:
On the Other tab check the: Class Variable checkbox
On the Name Tab enter: Name tab_set_demo
On the General tab you see: tab_item_1*
Click on it and an Edit box will appear. Change it as follows to create a tab for the button:
Label: My button
Name: tab_item_btn
Hit Apply.
Now create another tab for a table by hitting Add and tab_item_2 will be added and highlighted. Change it as follows to create a tab for the Table:
Label: My Table
Name: tab_item_table
Class variable should be checked. Hit Apply.
Now create a third tab by hitting Add and tab_item_3 will be added and highlighted. Change it as follows to create a tab for the Table:
Label  My misc
Name: tab_item_misc
Hit Apply.
Hit Okay and the dialog box will close. You will need to enlarge horizontally the dialog so that the three tabs appear in order. Refer to Figure 6.
Move the modeless button from the main canvas to the my button tab.
Right click on the Tabset to open the Tabset Setup dialog box. At the bottom, on the General Tab, you see:
tab_item_btn*
tab_item_table
tab_item_misc
The
* after tab_item_btn indicates it is the tab
item, you are currently editing. Click on tab_item_table so it is
highlighted, then hit the which button. Now tab_item_table
should have the star. Hit Okay, and you will now see on the main dialog that
the tab_item_table tab can be edited.
Add a table to this tab, by clicking on the Table Component on the Ivib Tool Bar. It is the fourth component from the left in the bottom row. Move the table from the main canvas to the my table tab. Resize it as shown in the Figure 8 of main.icn below:
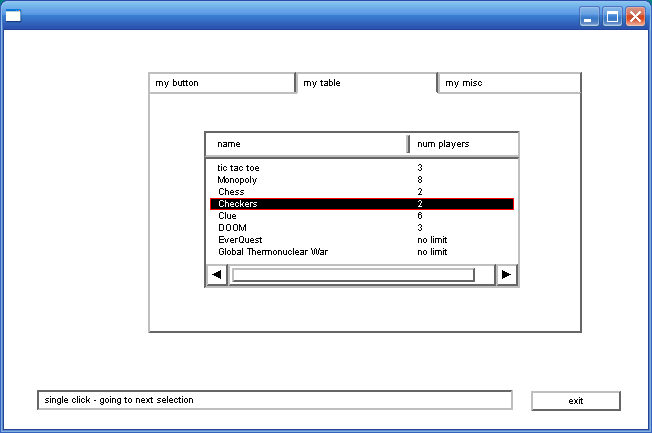
Figure 8: main.icn
We are going to add some columns in the table so right click on the table to get the Table Setup Dialog.
On the Other tab check the: Class Variable checkbox.
On the General tab in Table Setup, Hit the Add button.
Now we will add the first column to our information table. Add the following to the General tab:
Label :Name
Width: 200
Align l
Name: table_column_1 (class variable should be checked)
Hit Apply
Add another column by clicking the Add button:
Label :# of Players
Width: 125
Align  l
Name: table_column_2
(class variable should be checked)
Hit Apply
On the Selection tab, the drop down box that says No selection, change this to Select One. Note: If you change it to Select Many, then they can select multiple rows by Control Shift and Click (mouse) at the same time.
On the Events tab, hit the Add Button.
Under Event: Scroll down to MOUSE_RELEASE_EVENT
Under Handler enter:
on_table_1 (it may be automatically added)
Hit Apply
This will create a method on_table_1() that will be invoked by
a MOUSE_RELEASE_EVENT. Note: Make sure that this is the only
event added. Sometimes Ivib initially adds
an ACTION_EVENT. Please delete all other events.
Click Okay to close the setup dialog. You will probably need to make the Tabset and the Table larger as shown in Figure 8.
From the Ivib Menu, Save As main.icn.
Add the following code to the init_dialog() method in
main.icn:
method init_dialog()
   local lst
   lst := [["tic tac toe","3"], ["Monopoly","8"], ["Chess","2"], ["Checkers","2"],
             ["Clue","6"],["DOOM","3"],["EverQuest","no limit"],["Global Thermonuclear War","no limit"]]
   table_1.set_contents(lst)
   dedit := &null
end
Save main.icn. Compile and run the program. You should be able to click on
the tabs to display the three different tabs. Notice the 'My table Tab' is
displayed first. We can change this by setting the Which back to
tab_item_btn in Ivib if we want the button tab to show initially.
get_contents() and get_selections()
Add the following global variable to main.icn. This is the
table that will keep track of all the dialogs
global editdlgAlso, add two more lines to the
init_dialog() method. The
first new line initializes and creates the table editdlg. The
second new line sets the click delay so we can distinguish double clicks
from single clicks.
method init_dialog()
local lst
   lst := [["tic tac toe","3"], ["Monopoly","8"], ["Chess","2"], ["Checkers","2"], ["Clue","6"],["DOOM","3"],["EverQuest","no limit"],["Global Thermonuclear War","no limit"]]
   table_1.set_contents(lst)
   dedit := &null
   editdlg := table()
   set_double_click_delay(100000)  # set click  delay  ford double click
end
Add the following code to the method
on_table_1():
method on_table_1(ev)
local posn,poslst,msg,gamelst,cc
poslst := []
posn := 0
game := ""
gamelst := []
cc := 0

if \ev & \ev.source  & \ev.type &  \ev.param then
   write("sc ",image(ev.source)," type ",image(ev.type)," param ",image(ev.param))
else
    return

if \ev.param = -6 then { #right click
       posn := table_1.get_table_content().get_line_under_pointer() | 0
       if posn < 1 then return

       table_1.set_selections([posn]) #  add to selected list, highlight it
       table_1.goto_pos(posn)
       table_1.set_cursor(posn)
       label_msgbox.set_label("right click demo at pos  "||posn)
       self.display()
       return
 }
#
#  returns list of selected items in this case only one because 'select one' is set for the table
  poslst :=  table_1.get_selections() | []
   if *poslst > 0 then
     posn := poslst[1]   # the selected position
   else
     return
#  returns a list of lists with 2 items game and number players
   gamelst :=  table_1.get_contents()

#  get the selected name of the game from the table, the first item in the list
   game := gamelst[posn][1]
    cc := get_click_count()
   if cc > 1 then {
       game := game || " double click "
#    create a global table editdlg to keep track of all the open dialogs
     if not member (editdlg, posn) then {
       (editdlg[posn] := dialogedit(posn,game))
       editdlg[posn].show_modeless()
     }
     else {
       Raise(editdlg[posn].get_win())
        editdlg[posn].set_focus(editdlg[posn].label_msgbox)
     }
     return

   }  # end cc > 1

   if posn >= *gamelst then
       posn := 1
    else
       posn +:= 1

    table_1.set_selections([posn]) #  add to selected list, highlight it
    table_1.goto_pos(posn)
    table_1.set_cursor(posn)
    label_msgbox.set_label("single click - going to next selection ")
    label_msgbox.display()
 end
Save main.icn.
First, this code will write the ev.param, ev.type and ev.code to determine what the ev.param is for a right click. It is -6, so if there is a right click, it is displayed in label_msgbox and the selected position is highlighted and returns out of the method. Second, this code gets the selected item from a list of selected items by calling get_selections. Since we have set the table in Ivib to ‘select one’, only one item may be selected. So the list is either a one item list or empty if nothing has been selected. We can get the table contents by calling get_contents. For tables, it will return a list of lists where each list (inside the big list) represents a row of size equal to the number of columns. In this example, we only have two columns; games and players. If an item is double clicked, then the edit dialog for the selected game and position is displayed.
This example also demonstrates the use of the goto_pos, set_cursor and set_selections methods. If an item is single clicked, then the selection is moved to the next position unless it is the last position. If it is the last position, then it is moved to the first position. This is a pretty stupid thing to do, but it does demonstrate these features.
We are also passing the game name and its position to the edit dialog. So two variables will need to be added to the class definition for dialogedit in edit.icn as follows:
class dialogedit : Dialog(posn, msg, label_msgbox, text_button_exit)Note: Add posn as the first and msg as the second. The order is important. Also, note that Ivib will not alter them, but it will add new components in front of them. This means that you must move them back to the beginning if you add new components using Ivib.
Since we now have more multiple dialogs, we need to make sure they are set to &null when the edit dialog terminates. Therefore, the following code will also need to be added to edit.icn.
 method init_dialog()
 if \msg & \posn then
   label_msgbox.set_label(posn||" "||msg)
 end

method  on_text_button_exit(ev)
   delete(editdlg,posn)
   dedit := &null
   dispose()
end
Save edit.icn. Compile and run the program. If you right click on any of the rows in the table, 'right click demo at position x' will be displayed in the message label. If you double click on any of the games, you will see either a new dialog or an existing dialog will be raised to the front. The new dialog will display the chosen game and it's position. If you single click, the cursor position goes to the next game or to the beginning if you are on the last game. This program also writes to standard output the values of ev.source, ev.type, and ev.param every time the mouse is released on the table.
Right Click on the Overlay to add some attributes as follows:
On the Other tab, check the Class Variable checkbox.
On the Name tab, enter:
Name overlay_set
On the General tab, you see:
overlay_item_1*
Click on it and an Edit box will appear. Change the name as follows: This will be the initial overlay
Name: overlay_item_blankHit Apply.
Create a second overlay by hitting Add and overlay_item_2
will be added and
highlighted. Change the name as follows:
Name: overlay_item_edit
Hit Apply.
Click on overlay_item_edit so it is highlighted, then hit the which button. Now overlay_item_edit should have the star.
Hit Okay to close the setup dialog.
Add an EditableText List Box to the overlay by clicking the EditableText List component from the Ivib Menu Bar. It is the first one from the left in the second row. Move it on top of the Overlay and resize it (see figure 7 of edit.icn). Now, right click on it to get the dialog attributes.
On the Other tab, check the: Class Variable checkbox.
On the Name tab, enter:
Name editable_text_list_instruct
Hit Okay.
Add another EditableText List Box to the overlay by clicking the EditableText List component from the Ivib Menu Bar. It is the first one from the left in the second row. Move it on top of the Overlay and move it directly under the editable_text_list_instruct editabletextlist. (see figure 7 of edit.icn) Now, right click on it to get the dialog attributes
On the Other tab, check the Class Variable checkbox.
On the Name tab, enter:
Name editable_text_list_game
Hit Okay.
Set the overlay back to the blank overlay by right clicking on the Overlay to change the which. At the bottom in the OverlaySet Setup panel, Click on overlay_item_blank so it is highlighted, then hit the which button. Now overlay_item_blank should have the star. Hit Okay.
On the Other tab, check: Class Variable
On the Name tab, enter: Name text_button_cut
On the General tab, enter: Label Cut
On the Events Tab add:
Event					Handler
BUTTON_RELEASE_EVENT			on_text_button_cut
Make SURE this is the ONLY event. Delete any other events that may have been added by Ivib.
Hit Apply.
Hit Okay.
Do the same for the remaining buttons as follows:
Name text_button_copy
Label  Copy
Name text_button_paste
Label  Paste
Name text_button_undo
Label  Undo
Name text_button_redo
Label  Redo
Name text_button_ok
Label  OK
We are going to create code to add and verify the password. First Add a label to the canvas by clicking on the Label component (Abc) on the Ivib menu bar. Move the label below the buttons (see figure 7 of edit.icn). Right Click on the Label to add some attributes as follows:
On the Name tab, enter: Name: label_pw
On General Setup: Label : Password
On the Other tab, check the Class Variable checkbox.
Hit Okay.
Add a textfield to the canvas by clicking on the textField component on the Ivib tool bar. This is the component third from the top left. Move the textfield below the buttons and just to the right of the label_pw (see figure 7 of edit.icn). You may need to resize it. Right Click on the textfield to add some attributes as follows:
On the Other tab, check Class Variable
On the Name Tab enter: Name text_field_pw
Hit Okay.
You will probably want to resize it. Refer to Figure 7 of edit.icn. Save the
Dialog in Ivib as edit.icn.
Now edit the source file edit.icn. Remember to refresh the Ivib
changes.
Notice that in the class declaration, the components:
text_button_copy, text_button_cut,
text_button_paste, text_button_redo,
text_button_undo, text_button_ok,
editable_text_list_instruct, editable_text_list_game,
overlay_set, text_field_pw have been added before
posn and msg. You will need to move them to the
end because we are passing posn and msg from the
main dialog, and they must be the first and second variable.
The class variables should look something like this when you are finished:
class dialogedit : Dialog(posn, msg, text_button_copy, text_button_cut,
   text_button_paste, text_button_redo, text_button_undo, text_button_ok,
   editable_text_list_instruct, editable_text_list_game, overlay_set,
   text_field_pw , text_button_exit, label_msgbox, overlay_item_blank,
   overlay_item_edit, label_pw .............    )
We are going to let the user enter the game instructions only if they type in the password and hit the OK button. The overlay is initially set to
overlay_item_blank because we set the which button in
Ivib. However, when the correct password is typed, then the overlay will
switch over to overlay_item_edit so the instructions can be
entered. If the wrong password is typed and the OK button is hit, then we
will make the user wait. This demonstrates the use of the hour glass mouse
pointer. (Although, usually we use the hourglass when the program is
processing). Add the following code to edit.icn as follows:
method init_dialog()
if \msg & \posn then {
   label_msgbox.set_label(posn||" "||msg)
   editable_text_list_game.set_contents([msg])
}
text_field_pw.set_displaychar("*") # replace characters with * in password
end

method on_button_ok(ev)
local pw, t2, wait
pw := ""
label_msgbox.set_label("")
label_msgbox.display()

pw :=  text_field_pw.get_contents()
if pw == "joshua" then {
     overlay_set.set_which_one(overlay_item_edit)
     label_msgbox.set_label("Enter Game Instructions ")
     label_msgbox.display()

}
else {
   t2 := &time
   WAttrib(win,"pointer=" || ("wait"|"watch"))  # change mouse pointer to hourglass
   label_msgbox.set_label("Incorrect Password Please wait ")
   while &time - t2  < 5000 do
        wait := 1
   WAttrib(win,"pointer=arrow")  # change mouse pointer to arrow
   label_msgbox.set_label("OK try again ")
   label_msgbox.display()

  }
end
Save edit.icn. Compile and run the program. Double click on a game to get to
the edit screen. You will see that if you type in the correct password
('joshua'), and hit Ok, the blank edit box where you can type in
instructions will be visible. Hard coding passwords is not a good idea, but
this example demonstrates the use of overlays and replacing the characters
with stars. If you type in the wrong password, you will have to wait.
Open up edit.icn using your editor.
Add the following code to the init_dialog() method:
 method init_dialog()
  text_button_copy.clear_accepts_focus()  # keeps selected region
  text_button_cut.clear_accepts_focus()
   ........
   .........
 end
NOTE: THIS CODE IS NECESSARY TO ALLOW THE SELECTED REGION IN THE EDITABLE TEXTLIST TO REMAIN SELECTED. OTHERWISE, THE SELECTED REGION WILL BE LOST WHEN THE EVENT OF HITTING THE COPY OR CUT BUTTON IS INVOKED.
Now add the following code for copy, cut, paste, redo and undo.
method on_button_cut(ev)
editable_text_list_instruct.handle_cut()
end
method on_button_copy(ev)
editable_text_list_instruct.handle_copy()
end
method on_button_paste(ev)
editable_text_list_instruct.handle_paste()
end
method on_button_undo(ev)
editable_text_list_instruct.handle_undo()
end
method on_button_redo(ev)
editable_text_list_instruct.handle_redo()
end
Save edit.icn and compile and run the program.
unicon -o demo -G main edit myeditabletextlistYou should be able to copy/cut/paste/undo/redo in the
editable_text_list_instruct box. However, you may want to copy
text from other sources. We need to be able to cut/copy and paste using the
Windows clipboard. To do this we will need to create a subclass for our
EditableTextList. We will create a new file myeditabletextlist.icn that will
inherit all the methods of editabletext list except for:
handle_copy
handle_paste
handle_cut
Create a new file myeditabletextlist.icn and copy in the following code:
#
# myeditabletextlist subclass of EditableTextList to
# allow clipboard operation in Cut/Copy?paste
#
import gui
link graphics
import undo
$include "guih.icn"

class myeditabletextlist : EditableTextList()

   method handle_cut(e)
      start_handle(e)
      if has_region() then {
         copy_to_clipboard(get_region())
         delete_region(e)
      }
      end_handle(e)
   end

   method handle_copy(e)
      start_handle(e)
      if has_region() then {
         copy_to_clipboard(get_region())
      }
      end_handle(e)
   end

  method copy_to_clipboard(l)
   local large_str, i

   if /l | *l = 0 then fail
   large_str := l[1]

    every i := 2 to *l do
        large_str ||:=  l[i]

    WAttrib("selection=" || large_str)
    return large_str

   end

   method get_list_from_clipboard()
   local large_str, l, str,start,blank1,tab1,p
   blank1 := ' '
   tab1 := '\t'
   start := 1
   end1 := 1
   str := ""
   p := 1
   large_str := ""
   large_str := WAttrib("selection")
   if /large_str then fail
   l := []

   while   end1  :=   upto("\n",large_str,start,0) do {
      str := large_str[start:end1]
      if p := upto(&ascii--blank1,str) then
         str := str[p:0]
       put(l, str)
      start := end1 + 1
  }
  str := large_str[start:0]
  if p := upto(&ascii--blank1--tab1,str) then
     str := str[p:0]
  put(l,str)

  return l
  end

#  insert_cr is a global variable to tell paste
#  to add a line feed after each line
   method get_pasteable_clipboard(insert_cr)
      local x, t, s, c
      x := []
      t := ""

      x :=  get_list_from_clipboard() | fail

       every j := 1 to *x do  t := t || trim(string(x[j]))  || " "

      # Apply the filter to the string to paste
      s := ""
      every c := !t do {
         if member(printable, c) then
            s ||:= c
      }
      if *s = 0 then
         fail
      return s
   end


   method handle_paste(e,insert_cr)
      local s, ce, ed

      start_handle(e)
      if s := get_pasteable_clipboard(insert_cr) then {
         ce := CompoundEdit()

         if has_region() then {
            ed := EditableTextListDeleteRegionEdit(self)
            ed.redo()
            ce.add_edit(ed)
         }
         ed := EditableTextListPasteEdit(self, s)
         ed.redo()
         ce.add_edit(ed)

         undo_manager.add_edit(ce)
         changed := 1
      }
      end_handle(e)
   end
 end # myeditabletextlist class
Now open up edit.icn using Ivib. Right click on the Overlay set and switch
to overlay_item_edit. Right click on the top edit box text_list_instruct to
get the dialog box.
On the Name tab, change the Class to
myeditabletextList.
(Make sure this is all in lower case to match the class in
myeditabletextlist.icn)
Hit Okay, and save edit.icn
This will allow all cut/copy/pastes into
editable_text_list_instruct to use
our subclass to pick up the windows clipboard.
unicon -o demo -G main edit myeditabletextlistNow, when you run demo you should be able to cut, copy, paste from other documents into the instructions edit box (editable_text_list_instruct).
init_dialog() method:
 method init_dialog()
 editable_text_list_game.clear_accepts_focus() # allows tab jump or disables tab insert

  .......
  ........
 end
NOTE: This code will not allow the tab to jump to the editable_text_list_game box. It will disable any type of input to it. After completing this Tutorial, you may want to make editable_text_list_game a 'myeditabletextlist' component so you can use the tabs, copy, cut, paste, undo, redo from the buttons. This will require that events are used to determine which edit box (editable_text_list_game or editable_text_list_list) to apply the function.
You may want to use the tab key to jump from one component to another. In our demo, the tab key just inserts a tab into the first text box in edit.icn. Suppose, we would like the tab key to jump to another component. To do this, you need to add the following methods to the subclass myeditabletextlist.icn:
   method keeps(e)
      # This component keeps all events.
      return e ~=== "\t"
   end

   method handle_event(e)

      if (e === "\t")  then
         return

      (\self.vsb).handle_event(e)
      (\self.hsb).handle_event(e)
      if e === (&lpress | &rpress | &mpress) then
         handle_press(e)
      else if e === (&ldrag | &rdrag | &mdrag) then
         handle_drag(e)
      else if e === (&lrelease | &rrelease | &mrelease) then
         handle_release(e)
      else if \self.has_focus then {
         case e of {
            Key_Home : handle_key_home(e)
            Key_End : handle_key_end(e)
            Key_PgUp : handle_key_page_up(e)
            Key_PgDn : handle_key_page_down(e)
            Key_Up : handle_key_up(e)
            Key_Down : handle_key_down(e)
            Key_Left : handle_key_left(e)
            Key_Right : handle_key_right(e)
            "\b" : handle_delete_left(e)
            "\r" | "\l": handle_return(e)
            "\^k" : handle_delete_line(e)
            "\^a" : handle_select_all(e)
            "\^e" : handle_end_of_line(e)
            "\d" | "\^d" : handle_delete_right(e)
            "\^x" :  handle_cut(e)
            "\^c" :  handle_copy(e)
            "\^v" :  handle_paste(e)
            "\^z" :  handle_undo(e)
            "\^y" :  handle_redo(e)
            default : handle_default(e)
         }
      }
   end
Compile and run the program. Notice that the tab key makes the cursor jump
from component to component. If you want to order the tab jumps, go into
Ivib, hit control-shift and simultaneously select the text_button_paste,
text_button_undo, text_button_redo,text_field_pw, text_button_ok,
text_button_exit in that order respectively. While still holding the
control-shift, go to the Selection Item on the menu and select
'Reorder'. Now you can tab jump from top to bottom.
myundomanager.icn and copy the following code in to it.
import undo
# UndoManager is a CompoundEdit.  Until it is closed it allows undos and redos
# within its list of edits, moving a pointer into the list appropriately.
#
class myundomanager:UndoManager(limit, index)
   method add_edit(other)
      if \closed then
         return self.CompoundEdit.add_edit(other)
      while *l >= index do
          pull(l)
       put(l, other)
       index +:= 1

      while (*l > limit) & (index > 1) do {
         index -:= 1
         pop(l)
      }
   end
end # class
Now, edit myeditabletextlist.icn, and add initially code to use
MyUndoManager. Add this code right before the class end
statement:
   initially(a[])
      wordlist := []
      noedit := 0
      tab_move := &null
      self.LineBasedScrollArea.initially()
      self.set_accepts_focus()
      undo_manager := myundomanager()  # use local undomanager
      printable := cset(&cset[33:0]) ++ '\t\n'
      tab_width := 8
      set_wrap_mode("off")
      self.cursor_x := self.cursor_y := 1
      set_fields(a)   # insert initially before class end statement
   # NO END STATEMENT FOR INITIALLY

 end # class myeditabletextlist.icn
Compile and link
unicon -o demo -G main edit myeditabletextlist myundomanagerRun the demo again to test the single undos/redos.
Edit main.icn. Add a class variable table_1_col_select to the
class declaration. We will use this variable to tell us if the column has
been clicked. The class declaration should look like the following:
class dialogmain : Dialog (table_1_col_select, tab_item_btn, ..........Add the following lines to the end of
init_dialog():
method init_dialog()
   .......
   ......
   table_1_col_select := 0  # class variable initialize
   on_table_1()  # Listen for events
end
Next we need to add code to on_table_1 which is triggered by a MOUSE_RELEASE_EVENT to listen for a column event.
Add the following code to the beginning of the method on_table_1():
method on_table_1(ev)
 local posn,poslst,msg,gamelst,cc
poslst := []
posn := 0
game := ""
gamelst := []
cc := 0
table_1.get_column(1).connect(self, "on_table_column_1", MOUSE_RELEASE_EVENT)
  if  table_1_col_select = 1 then {
     table_1_col_select := 0
     return
  }

 table_1.get_column(2).connect(self, "on_table_column_2", MOUSE_RELEASE_EVENT)
  if  table_1_col_select = 1 then {
     table_1_col_select := 0
     return
  }

if \ev & \ev.source  & \ev.type &  \ev.param then
.......
........

end
Add the following to methods to handle the events. These methods Sort the
selected columns:
method on_table_column_1()
local lst,k,slst ,T
lst := []
slst := []
table_1_col_select := 1
lst :=    table_1.get_contents()
T := table()

every k := 1 to *lst do
  insert(T,lst[k][1],lst[k][2])

lst := sort(T,1)
table_1.set_contents(lst) # sort by table key
end

method on_table_column_2()
local lst,k,slst ,T
lst := []
table_1_col_select := 1
lst :=    table_1.get_contents()
T := table()
every k := 1 to *lst do
  insert(T,lst[k][1],lst[k][2])

lst := []
lst := sort(T,2)  # sort by table elements
table_1.set_contents(lst)
end
Compile and run. When you click on the table columns, they should sort by Name or number of players. This demonstrates the use of table columns.
It is possible to use Ivib with regular procedural code, and it would be easy to extend Ivib to call a procedure for each event. This would allow Icon programmers to benefit from the new GUI toolkit. We would be happy to see this added to Ivib.
C. Jeffery, S. Mohamed, R. Pereda, R. Parlett, "Programming with Unicon", unicon.sourceforge.net/ub/ub.pdf, 2001-2005.